Custom model and Transform
![]()
This notebook contains the simple examples of custom model and Transform that can be added to the ETNA framework.
Table of Contents
[1]:
import warnings
from pandas.core.common import SettingWithCopyWarning

warnings.filterwarnings(action="ignore", message="Torchmetrics v0.9")
warnings.filterwarnings(action="ignore", message="`tsfresh` is not available")
warnings.filterwarnings(action="ignore", category=SettingWithCopyWarning)
[2]:
import pandas as pd

from etna.datasets.tsdataset import TSDataset
from etna.transforms import LagTransform
from etna.transforms import SegmentEncoderTransform
from etna.transforms import DateFlagsTransform
from etna.transforms import LinearTrendTransform
from etna.pipeline import Pipeline
from etna.metrics import MAE
from etna.analysis import plot_backtest
1. What is Transform and how it works
Our library works with the spacial data structure TSDataset. So, before starting, we need to convert the classical DataFrame to TSDataset.
[3]:
df = pd.read_csv("data/example_dataset.csv")
df["timestamp"] = pd.to_datetime(df["timestamp"])
df = TSDataset.to_dataset(df)
ts = TSDataset(df, freq="D")

ts.head(5)
[3]:
| segment | segment_a | segment_b | segment_c | segment_d |
|---|---|---|---|---|
| feature | target | target | target | target |
| timestamp | ||||
| 2019-01-01 | 170 | 102 | 92 | 238 |
| 2019-01-02 | 243 | 123 | 107 | 358 |
| 2019-01-03 | 267 | 130 | 103 | 366 |
| 2019-01-04 | 287 | 138 | 103 | 385 |
| 2019-01-05 | 279 | 137 | 104 | 384 |
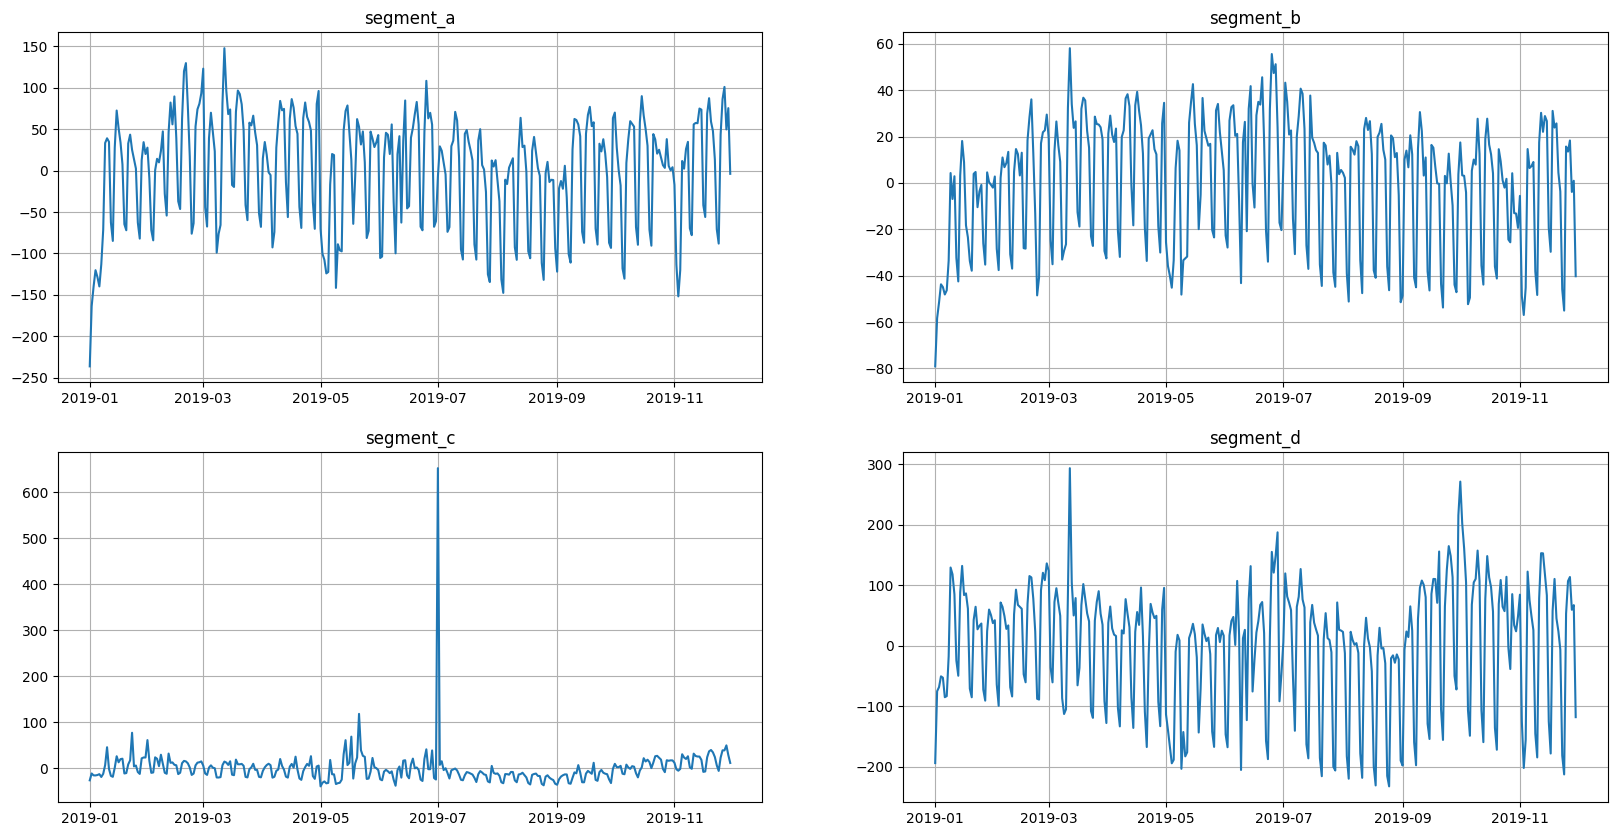
Let’s look at the original view of data
[4]:
ts.plot()

Transform is the manipulation of data to extract new features or update created ones.
In ETNA, Transforms can change column values or add new ones.
For example:
DateFlagsTransform - adds columns with information about the date (day number, is the day a weekend, etc.) .
LinearTrendTransform - subtracts a linear trend from the series (changes it).
[5]:
dates = DateFlagsTransform(day_number_in_week=True, day_number_in_month=False, out_column="dateflag")
detrend = LinearTrendTransform(in_column="target")

ts.fit_transform([dates, detrend])

ts.head(3)
[5]:
| segment | segment_a | segment_b | segment_c | segment_d | ||||||||
|---|---|---|---|---|---|---|---|---|---|---|---|---|
| feature | dateflag_day_number_in_week | dateflag_is_weekend | target | dateflag_day_number_in_week | dateflag_is_weekend | target | dateflag_day_number_in_week | dateflag_is_weekend | target | dateflag_day_number_in_week | dateflag_is_weekend | target |
| timestamp | ||||||||||||
| 2019-01-01 | 1 | False | -236.276825 | 1 | False | -79.162964 | 1 | False | -26.743498 | 1 | False | -194.070140 |
| 2019-01-02 | 2 | False | -163.575877 | 2 | False | -58.358457 | 2 | False | -11.861383 | 2 | False | -75.292679 |
| 2019-01-03 | 3 | False | -139.874928 | 3 | False | -51.553950 | 3 | False | -15.979267 | 3 | False | -68.515217 |
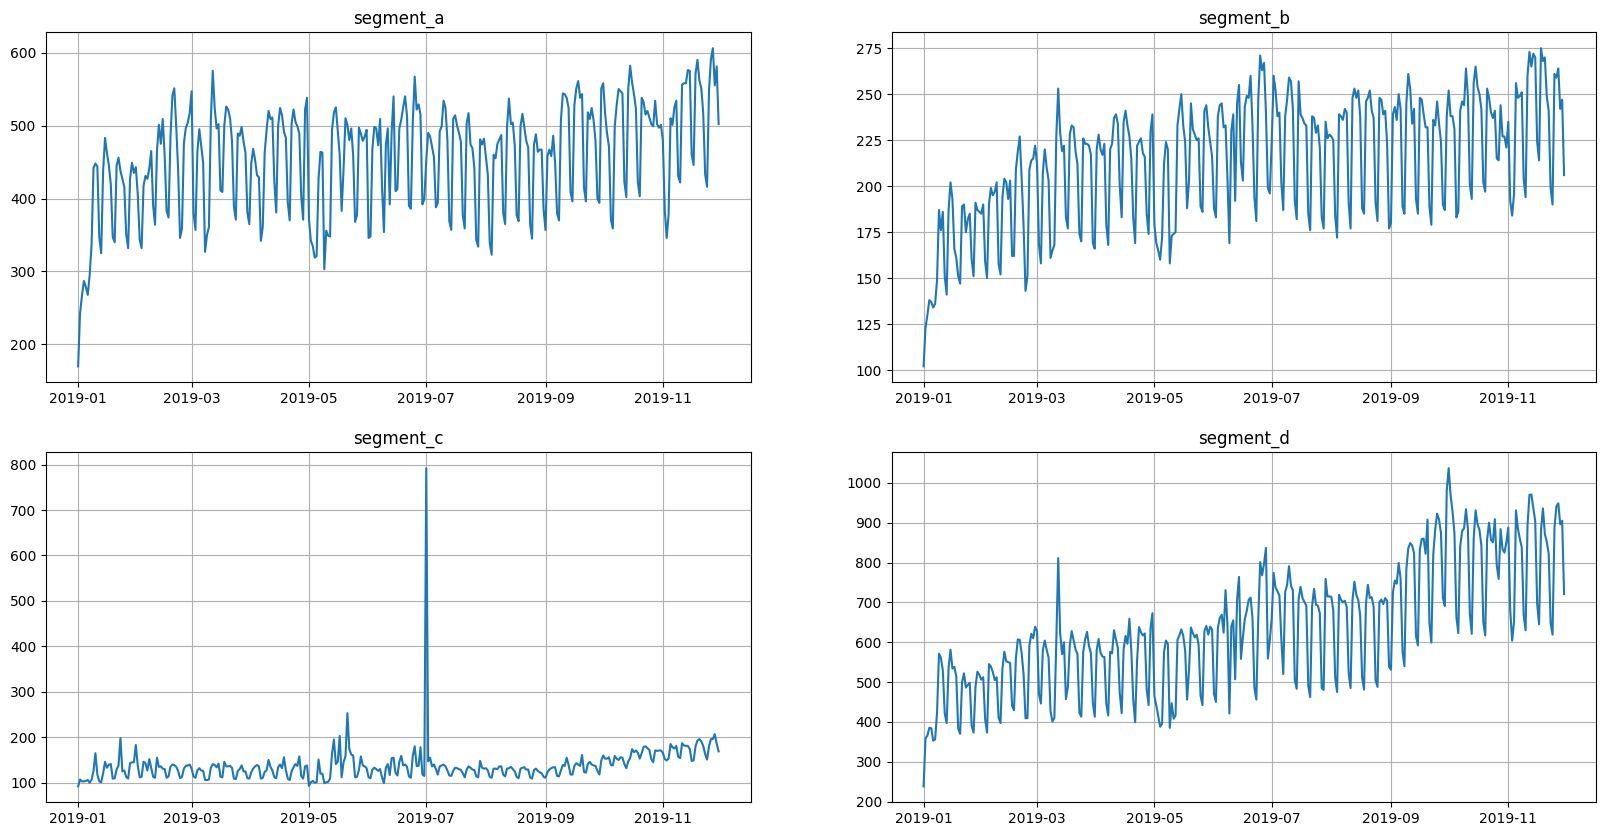
In addition to the appearance of a new column, the values in the target column have changed. This can be seen from the graphs.
[6]:
ts.plot()
[7]:
ts.inverse_transform()
ts.head(3)
[7]:
| segment | segment_a | segment_b | segment_c | segment_d | ||||||||
|---|---|---|---|---|---|---|---|---|---|---|---|---|
| feature | dateflag_day_number_in_week | dateflag_is_weekend | target | dateflag_day_number_in_week | dateflag_is_weekend | target | dateflag_day_number_in_week | dateflag_is_weekend | target | dateflag_day_number_in_week | dateflag_is_weekend | target |
| timestamp | ||||||||||||
| 2019-01-01 | 1 | False | 170.0 | 1 | False | 102.0 | 1 | False | 92.0 | 1 | False | 238.0 |
| 2019-01-02 | 2 | False | 243.0 | 2 | False | 123.0 | 2 | False | 107.0 | 2 | False | 358.0 |
| 2019-01-03 | 3 | False | 267.0 | 3 | False | 130.0 | 3 | False | 103.0 | 3 | False | 366.0 |
Now the data is back in its original form
[8]:
ts.plot()

2. Custom Transform
Let’s define custom Transform.
Consider a Transform that sets bounds at the top and bottom - FloorCeilTransform
ETNA use PerSegmentWrapper, so it is enough to describe the transformation for one segment and then apply it.
Any Transform inherits from the base class.
[9]:
from etna.transforms.base import PerSegmentWrapper
from etna.transforms.base import Transform
[10]:
# Class for processing one segment.
class _OneSegmentFloorCeilTransform(Transform):

    # Constructor with the name of the column to which the transformation will be applied.
    def __init__(self, in_column: str, floor: float, ceil: float):
        """
        Create instance of _OneSegmentLinearTrendBaseTransform.

        Parameters
        ----------
        in_column:
            name of processed column
        floor:
            lower bound
        ceil:
            upper bound
        """
        self.in_column = in_column
        self.floor = floor
        self.ceil = ceil

    # Provide the necessary training. For example calculates the coefficients of a linear trend.
    # In this case, we calculate the indices that need to be changed
    # and remember the old values for inverse transform.
    def fit(self, df: pd.DataFrame) -> "_OneSegmentFloorCeilTransform":
        """
        Calculate the indices that need to be changed.

        Returns
        -------
        self
        """
        target_column = df[self.in_column]

        self.floor_indices = target_column < self.floor
        self.floor_values = target_column[self.floor_indices]

        self.ceil_indices = target_column > self.ceil
        self.ceil_values = target_column[self.ceil_indices]

        return self

    # Apply changes.
    def transform(self, df: pd.DataFrame) -> pd.DataFrame:
        """
        Drive the value to the interval [floor, ceil].

        Parameters
        ----------
        df:
            DataFrame to transform

        Returns
        -------
        transformed series
        """
        result_df = df.copy()
        result_df[self.in_column].iloc[self.floor_indices] = self.floor
        result_df[self.in_column].iloc[self.ceil_indices] = self.ceil

        return result_df

    # Do it all in one action. Base class requirement.
    def fit_transform(self, df: pd.DataFrame) -> pd.DataFrame:
        return self.fit(df).transform(df)

    # Returns back changed values.
    def inverse_transform(self, df: pd.DataFrame) -> pd.DataFrame:
        """
        Inverse transformation for transform. Return back changed values.

        Parameters
        ----------
        df:
            data to transform

        Returns
        -------
        pd.DataFrame
            reconstructed data
        """
        result = df.copy()
        result[self.in_column][self.floor_indices] = self.floor_values
        result[self.in_column][self.ceil_indices] = self.ceil_values

        return result
Now we can define class, which will work with the entire dataset, applying a transform(_OneSegmentFloorCeilTransform) to each segment.
This functionality is provided by PerSegmentWrapper.
[11]:
class FloorCeilTransform(PerSegmentWrapper):
    """Transform that truncate values to an interval [ceil, floor]"""

    def __init__(self, in_column: str, floor: float, ceil: float):
        """Create instance of FloorCeilTransform.
        Parameters
        ----------
        in_column:
            name of processed column
        floor:
            lower bound
        ceil:
            upper bound
        """
        self.in_column = in_column
        self.floor = floor
        self.ceil = ceil
        super().__init__(
            transform=_OneSegmentFloorCeilTransform(in_column=self.in_column, floor=self.floor, ceil=self.ceil)
        )
Lets take a closer look.
This is what the original data looks like.
[12]:
ts.plot()
[13]:
bounds = FloorCeilTransform(in_column="target", floor=150, ceil=600)

ts.fit_transform([bounds])
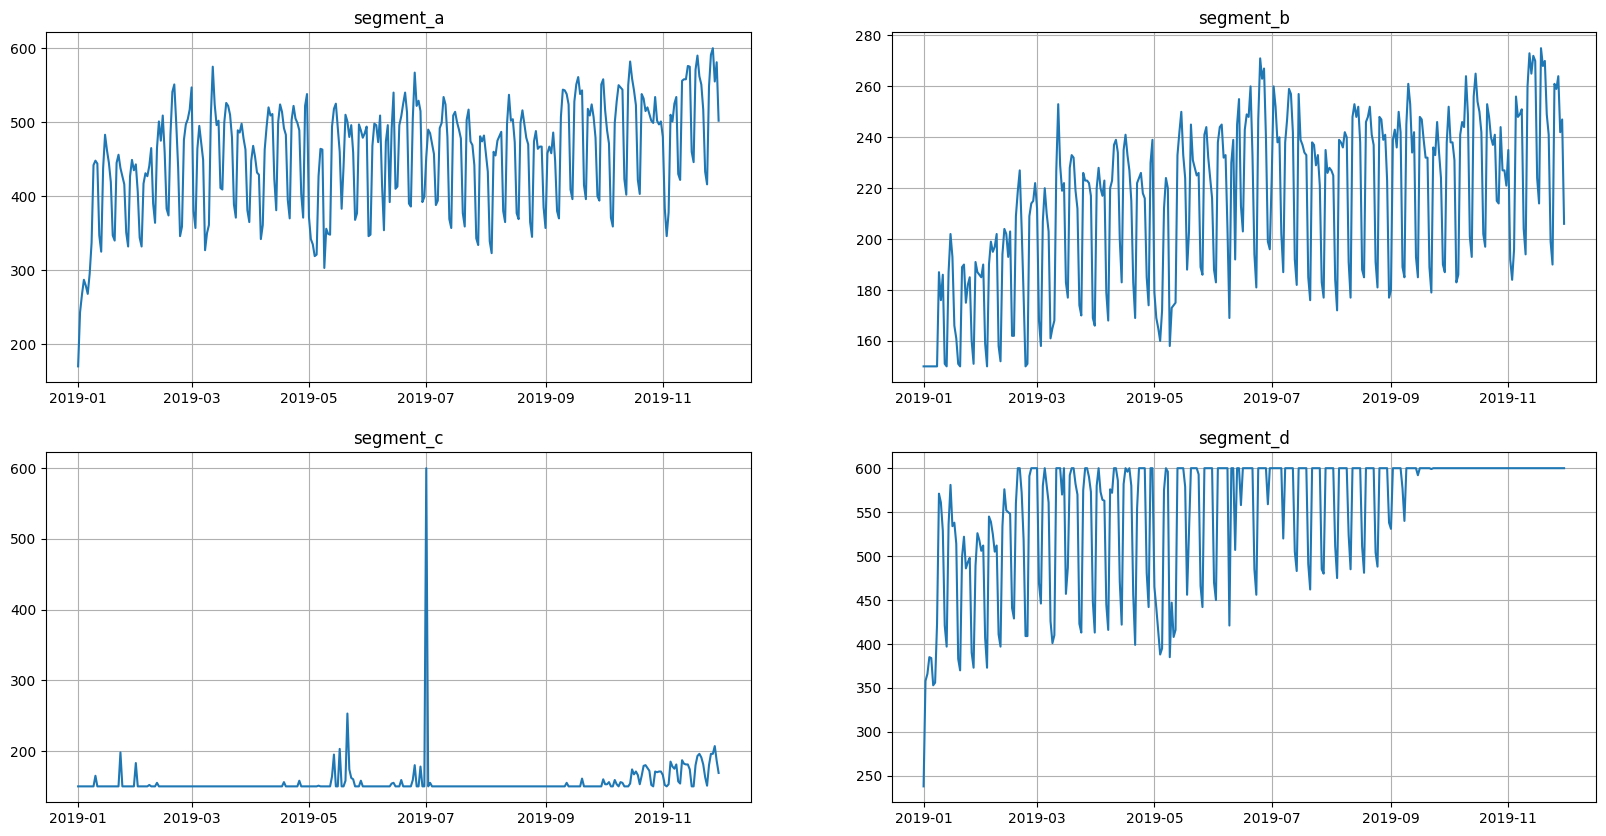
The values are now limited. Let’s see how it looks
[14]:
ts.plot()
Returning to the original values
[15]:
ts.inverse_transform()
[16]:
ts.plot()

Everything seems to be working correctly. Remember to write the necessary tests before adding a new transform to the library.
3. Custom Model
If you could not find a suitable model among the ready-made ones, then you can create your own.
In this example we will try to add model based on lightgbm package.
[17]:
!pip install lightgbm -q
Creating a new model from scratch
First, let’s look at creating a new model from scratch. First of all, we should choose our base class. There are: * NonPredictionIntervalContextIgnorantAbstractModel: model can’t generate prediction intervals and doesn’t require context to make predictions, * NonPredictionIntervalContextRequiredAbstractModel: model can’t generate prediction intervals and requires context to make predictions, * PredictionIntervalContextIgnorantAbstractModel: model can generate prediction intervals
and doesn’t require context to make predictions, * PredictionIntervalContextRequiredAbstractModel: model can generate prediction intervals and requires context to make predictions.
These classes have different signatures for forecast and predict methods depending on their name. * All signatures accept ts: TSDataset parameter for making prediction. * If a model can generate prediction intervals it also accepts prediction_interval: bool and quantiles: Sequence[float] parameters. * If a model requires context it also accepts prediction_size: int parameter, that is required to distinguish history context from points we want to make prediction on.
Let’s make some clarifications about the context. It is a part of a dataset before prediction points that is necessary for making forecasts. It is necessary for models that in its core use previous points to make predictions into the future. The example is etna.models.NaiveMode(lag=1) that uses last point to predict the next.
Ok, what about model based on lightgbm? This model doesn’t require context and we will make implementation that doesn’t generate prediction intervals.
[18]:
from lightgbm import LGBMRegressor
from etna.models.base import NonPredictionIntervalContextIgnorantAbstractModel
Let’s look at implementation.
[19]:
class LGBMModel(NonPredictionIntervalContextIgnorantAbstractModel):
    def __init__(
        self,
        boosting_type="gbdt",
        num_leaves=31,
        max_depth=-1,
        learning_rate=0.1,
        n_estimators=100,
        **kwargs,
    ):
        self.boosting_type = boosting_type
        self.num_leaves = num_leaves
        self.max_depth = max_depth
        self.learning_rate = learning_rate
        self.n_estimators = n_estimators
        self.kwargs = kwargs
        self.model = LGBMRegressor(
            boosting_type=self.boosting_type,
            num_leaves=self.num_leaves,
            max_depth=self.max_depth,
            learning_rate=self.learning_rate,
            n_estimators=self.n_estimators,
            **self.kwargs,
        )

    def fit(self, ts: TSDataset) -> "LGBMModel":
        """Fit model.

        Parameters
        ----------
        ts:
            Dataset with features

        Returns
        -------
        :
            Model after fit
        """
        df = ts.to_pandas(flatten=True)
        df = df.dropna()
        features = df.drop(columns=["timestamp", "segment", "target"])
        self._categorical = features.select_dtypes(include=["category"]).columns.to_list()
        target = df["target"]
        self.model.fit(X=features, y=target, categorical_feature=self._categorical)

    def forecast(self, ts: TSDataset) -> TSDataset:
        """Make predictions.

        Parameters
        ----------
        ts:
            Dataset with features

        Returns
        -------
        :
            Dataset with predictions
        """
        horizon = len(ts.df)
        df = ts.to_pandas(flatten=True)
        features = df.drop(columns=["timestamp", "segment", "target"])
        y_flat = self.model.predict(features)
        y = y_flat.reshape(-1, horizon).T
        ts.loc[:, pd.IndexSlice[:, "target"]] = y
        ts.inverse_transform()
        return ts

    def predict(self, ts: TSDataset) -> TSDataset:
        """Make predictions.

        Parameters
        ----------
        ts:
            Dataset with features

        Returns
        -------
        :
            Dataset with predictions
        """
        return self.forecast(ts=ts)

    def get_model(self) -> LGBMRegressor:
        """Get internal lightgbm model.

        Returns
        -------
        :
            lightgbm model.
        """
        return self.model
Let’s test it.
[20]:
HORIZON = 31
[21]:
trend = LinearTrendTransform(in_column="target")
lags = LagTransform(in_column="target", lags=list(range(31, 96, 1)), out_column="lag")
date_flags = DateFlagsTransform(
    day_number_in_week=True,
    day_number_in_month=True,
    week_number_in_month=True,
    week_number_in_year=True,
    month_number_in_year=True,
    year_number=True,
    special_days_in_week=[5, 6],
    out_column="date_feature",
)
segment_encoder = SegmentEncoderTransform()

transforms = [
    trend,
    lags,
    date_flags,
    segment_encoder,
]
[22]:
model = LGBMModel(random_state=42)
pipeline = Pipeline(model=model, transforms=transforms, horizon=HORIZON)
metrics_df, forecast_df, _ = pipeline.backtest(ts=ts, metrics=[MAE()], n_folds=3)
[Parallel(n_jobs=1)]: Using backend SequentialBackend with 1 concurrent workers.
/srv/conda/envs/notebook/lib/python3.7/site-packages/lightgbm/basic.py:2065: UserWarning: Using categorical_feature in Dataset.
  _log_warning('Using categorical_feature in Dataset.')
[Parallel(n_jobs=1)]: Done   1 out of   1 | elapsed:  1.6min remaining:    0.0s
/srv/conda/envs/notebook/lib/python3.7/site-packages/lightgbm/basic.py:2065: UserWarning: Using categorical_feature in Dataset.
  _log_warning('Using categorical_feature in Dataset.')
[Parallel(n_jobs=1)]: Done   2 out of   2 | elapsed:  2.9min remaining:    0.0s
/srv/conda/envs/notebook/lib/python3.7/site-packages/lightgbm/basic.py:2065: UserWarning: Using categorical_feature in Dataset.
  _log_warning('Using categorical_feature in Dataset.')
[Parallel(n_jobs=1)]: Done   3 out of   3 | elapsed:  5.5min remaining:    0.0s
[Parallel(n_jobs=1)]: Done   3 out of   3 | elapsed:  5.5min finished
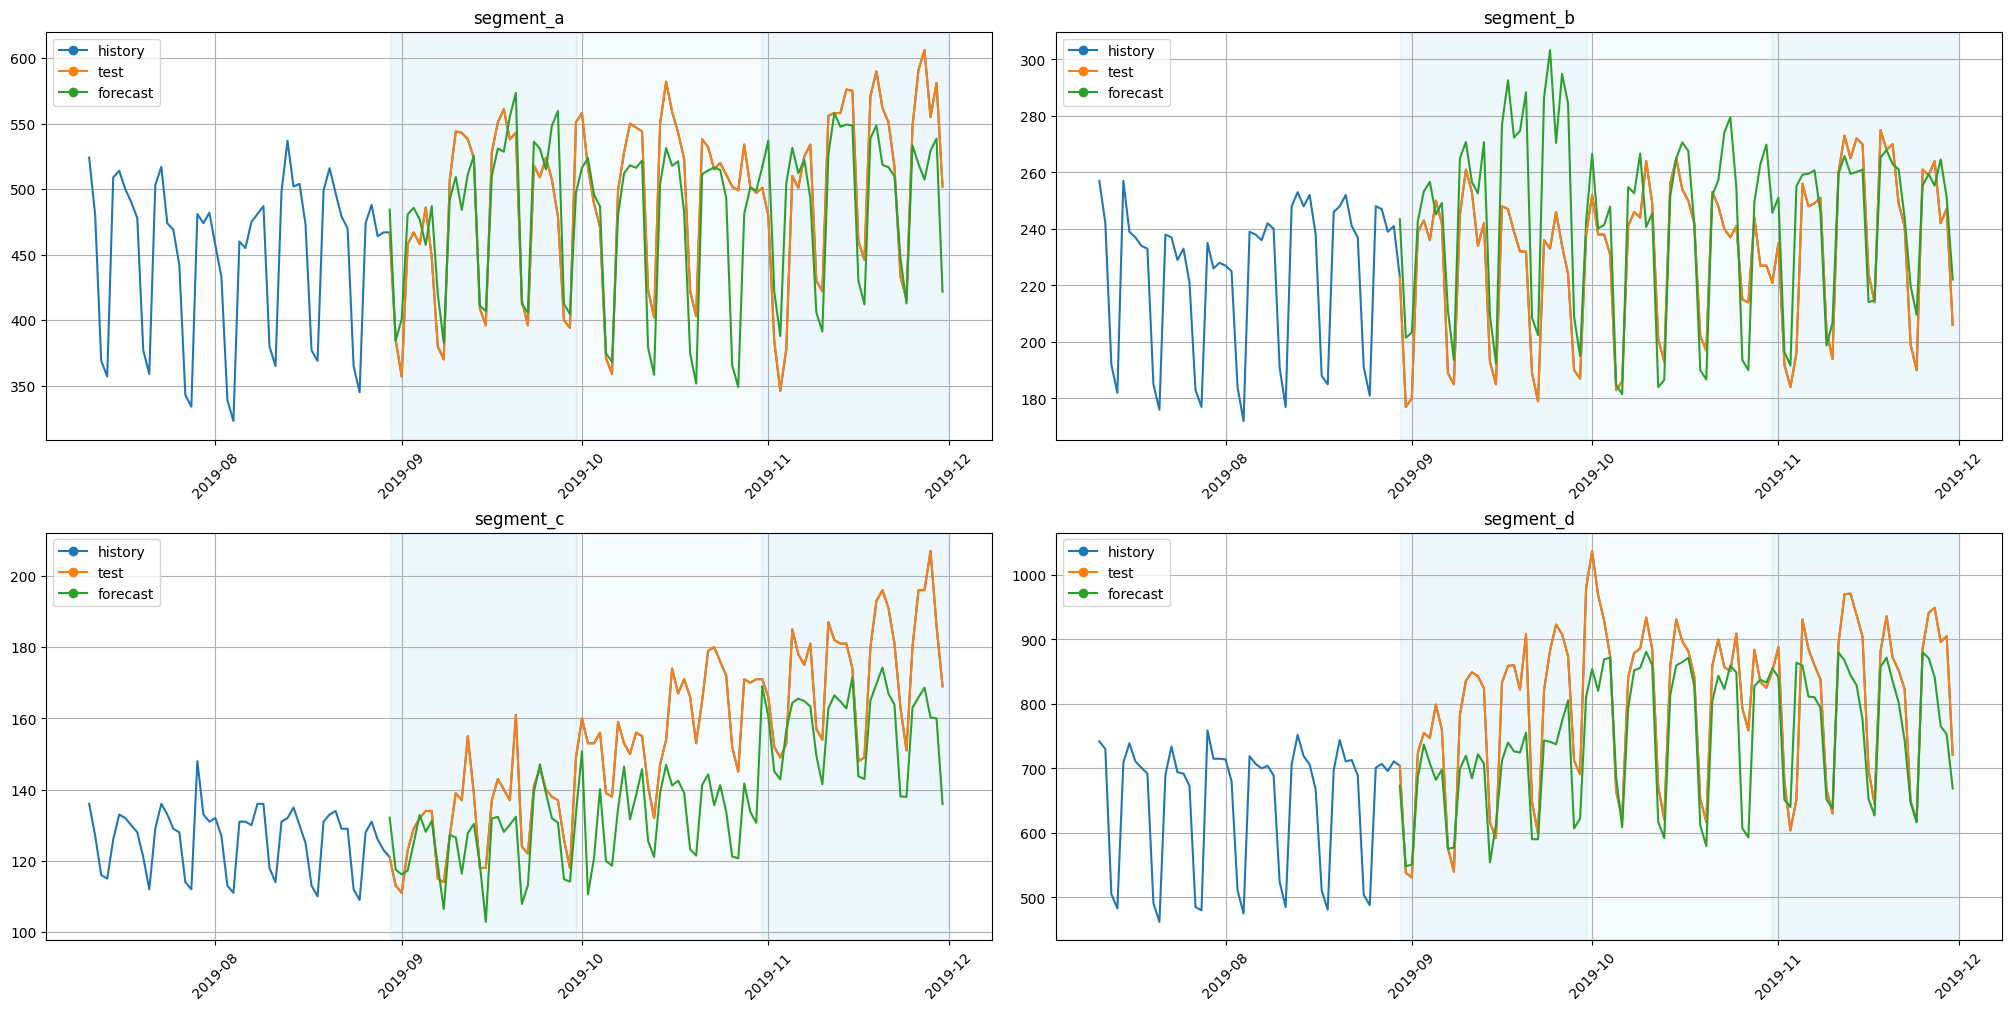
Let’s look at the results.
[23]:
plot_backtest(forecast_df=forecast_df, ts=ts, history_len=50)
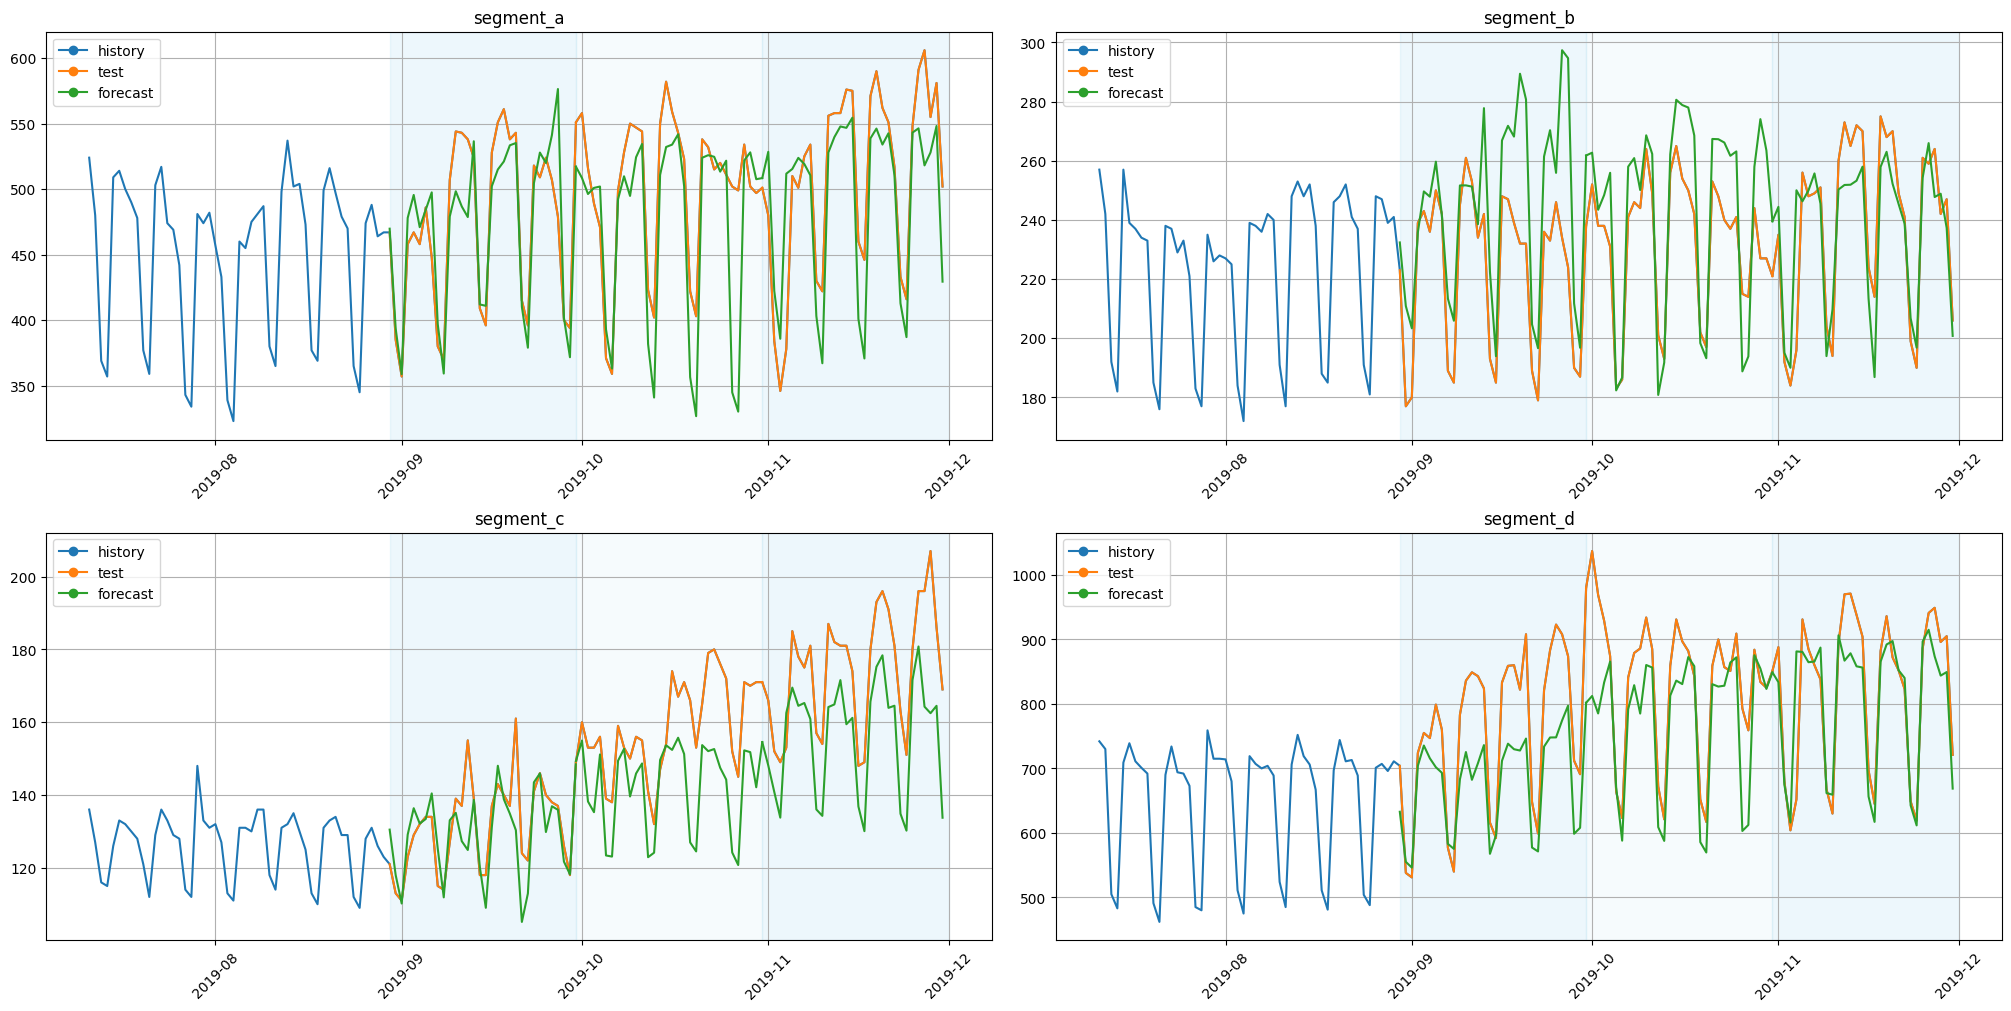
As we can see, predictions make sense.
Creating a new model using sklearn interface
Now let’s create our model by leveraging already existing etna classes: * etna.models.SklearnPerSegmentModel: accepts sklearn-like model and creates etna-model that fits one model per each segment. * etna.models.SklearnMultiSegmentModel: accepts sklearn-like model and creates etna-model that fits one model on entire dataset & mdash; it is that we implemented in a section above.
[24]:
from etna.models import SklearnPerSegmentModel
from etna.models import SklearnMultiSegmentModel
First, let’s implement etna-model that fits separate model per each segment.
[25]:
class LGBMPerSegmentModel(SklearnPerSegmentModel):
    def __init__(
        self,
        boosting_type="gbdt",
        num_leaves=31,
        max_depth=-1,
        learning_rate=0.1,
        n_estimators=100,
        **kwargs,
    ):
        self.boosting_type = boosting_type
        self.num_leaves = num_leaves
        self.max_depth = max_depth
        self.learning_rate = learning_rate
        self.n_estimators = n_estimators
        self.kwargs = kwargs
        model = LGBMRegressor(
            boosting_type=self.boosting_type,
            num_leaves=self.num_leaves,
            max_depth=self.max_depth,
            learning_rate=self.learning_rate,
            n_estimators=self.n_estimators,
            **self.kwargs,
        )
        super().__init__(regressor=model)


class LGBMMultiSegmentModel(SklearnMultiSegmentModel):
    def __init__(
        self,
        boosting_type="gbdt",
        num_leaves=31,
        max_depth=-1,
        learning_rate=0.1,
        n_estimators=100,
        **kwargs,
    ):
        self.boosting_type = boosting_type
        self.num_leaves = num_leaves
        self.max_depth = max_depth
        self.learning_rate = learning_rate
        self.n_estimators = n_estimators
        self.kwargs = kwargs
        model = LGBMRegressor(
            boosting_type=self.boosting_type,
            num_leaves=self.num_leaves,
            max_depth=self.max_depth,
            learning_rate=self.learning_rate,
            n_estimators=self.n_estimators,
            **self.kwargs,
        )
        super().__init__(regressor=model)
Let’s try to recreate results of LGBMModel using LGBMMultiSegmentModel.
[26]:
model = LGBMMultiSegmentModel(random_state=42)
pipeline = Pipeline(model=model, transforms=transforms, horizon=HORIZON)
metrics_df_multi_segment, forecast_df, _ = pipeline.backtest(ts=ts, metrics=[MAE()], n_folds=3)
[Parallel(n_jobs=1)]: Using backend SequentialBackend with 1 concurrent workers.
[Parallel(n_jobs=1)]: Done   1 out of   1 | elapsed:  2.8min remaining:    0.0s
[Parallel(n_jobs=1)]: Done   2 out of   2 | elapsed:  8.3min remaining:    0.0s
[Parallel(n_jobs=1)]: Done   3 out of   3 | elapsed: 13.0min remaining:    0.0s
[Parallel(n_jobs=1)]: Done   3 out of   3 | elapsed: 13.0min finished
Let’s look at the results.
[27]:
plot_backtest(forecast_df=forecast_df, ts=ts, history_len=50)
As we can see, the results are a little bit different. Let’s check this manually by looking at the values.
[28]:
metrics_df.head()
[28]:
| segment | MAE | fold_number | |
|---|---|---|---|
| 0 | segment_a | 22.633598 | 0 |
| 0 | segment_a | 35.034894 | 1 |
| 0 | segment_a | 35.003214 | 2 |
| 1 | segment_b | 22.285198 | 0 |
| 1 | segment_b | 16.546921 | 1 |
[29]:
metrics_df_multi_segment.head()
[29]:
| segment | MAE | fold_number | |
|---|---|---|---|
| 0 | segment_a | 23.121324 | 0 |
| 0 | segment_a | 34.062925 | 1 |
| 0 | segment_a | 34.721675 | 2 |
| 1 | segment_b | 25.587469 | 0 |
| 1 | segment_b | 13.960903 | 1 |
Why do we see this difference? In LGBMModel we have a special handling of categorical features, but in LGBMMultiSegmentModel we doesn’t have it, because etna.models.SklearnMultiSegmentModel doesn’t implement this logic with categorical features.
As you can see, etna.models.SklearnPerSegmentModel and etna.models.SklearnMultiSegmentModel have some limitations, but they should cover a lot of cases.
This raises a question: what if I want to implement per-segment logic manually with handling categorical features like in LGBMModel? A good reference for such a task will be the implementations of etna.models.CatBoostPerSegmentModel and etna.models.CatBoostMultiSegmentModel. There we use special mixins for per-segment/multi-segment logic.
If you want to add you model to the library don’t forget to write the necessary tests and documentation. Good luck!